Field history tracking is a Salesforce feature that allows tracking of changes to object field changes over time. In today's post well cover:
- What is field track history in Salesforce
- Changes to field change history data retention coming in the Spring 19 release
- How to use SOQL and workbench to find fields with track history enabled
What is Field Track History?
Salesforce comes out of the box with field change tracking functionality for standard and custom object fields. When enabled, up to 20 fields can have changes tracked for most objects in Salesforce. The field value changes are stored in object "history" tables and can be viewed from the Object History related list on an object record, from history reports, weekly data exports, data loader and API access.
Changes to field tracking history data in Spring 19
The Spring 19 release, which goes live in February 2019, brings the enforcement of Salesforce’s policy for retaining field tracked change data for orgs created after June 1, 2011. If you org was created after this date and, tracked change history data will be available in your instance for:
- 18 months via the User Interface
- 24 months via API / Data Loader
After 24 months Salesforce will schedule deletion of track field history change data that meets this criteria. For more info see the Spring 19 release notes.
My Org is affected by this change
So you’ve determined that your Salesforce instance is affected by the Spring 19 change. The next step is to assess which the object fields are currently being tracked for changes.
Before we continue, you should note that we are looking at field change history in this post and not Chatter feed tracking, which is separate.
Before we continue, you should note that we are looking at field change history in this post and not Chatter feed tracking, which is separate.
Finding tracked history fields in Salesforce
There are a few options for identifying objects with track history enabled in your Salesforce instance:
- Manually review each object in Salesforce
- Open Dataloader (or your dataloader of choice) to see History objects
- Use SOQL
Being an awesome admin means you're all about efficiency. With lots to do, manually reviewing objects could take a long time. So we are going to use SOQL to easily identify the fields enabled for track history. Let’s dive in.
So what is SOQL?
Wait a minute. What's this SQOL you speak of? SOQL stands for Salesforce Object Query Language, and allows admins and developers to run queries on salesforce data and metadata. You can find out more on SOQL at https://developer.salesforce.com/docs/atlas.en-us.soql_sosl.meta/soql_sosl/sforce_api_calls_soql.htm and in this trailhead module - https://trailhead.salesforce.com/en/content/learn/modules/apex_database/apex_database_soql.
With SOQL, you can access two objects called EntityDefinition and FieldDefinition, which store metadata about sobjects and their related fields. We'll query these objects to identify if track history is enabled on a field without having to manually review each object in Salesforce.
Even if you've never used SOQL before, you can easily complete this task and let the platform do the hard work for you. Note that for this example I’m going to use Workbench. However you can also use the Developer Console in Salesforce if you prefer. You can also use your IDE / Data Loader of choice to export the results.
Viewing fields with Track History Enabled
- Open a web browser and go to https://developerforce.salesforce.com
- Select the instance type (Production or Sandbox), select an API version (or leave the default) and agree to the terms of use
- Click Login with Salesforce

- Log in to your salesforce org (unless already logged in)
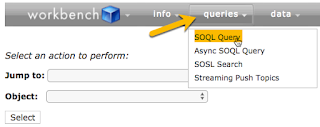
- Go to Query > SOQL Query
View all tracked fields and the related object:
1) Copy and paste the following SOQL statement in the query window:
SELECT entitydefinition.developername, entitydefinition.qualifiedAPIname, QualifiedApiName, label, datatype, length, ExtraTypeInfo, precision FROM FieldDefinition WHERE EntityDefinition.QualifiedApiName !=null and IsFieldHistoryTracked = true
2) Click Query
Sample output:

Note - The output includes object fields that salesforce enables track history on.
View tracked fields for specific objects
1) Copy and paste the following SOQL statement in the query window:
SELECT entitydefinition.developername, entitydefinition.qualifiedAPIname, QualifiedApiName, label, datatype, length, ExtraTypeInfo, precision FROM FieldDefinition WHERE EntityDefinition.QualifiedApiName in ('Account','Contact','Lead','Task','Event', 'Opportunity','Contract') AND IsFieldHistoryTracked = true
2) Click Query
NOTE: Add or remove salesforce objects as required from the second SQOL statement ('Account','Contact','Lead','Task','Event', 'Opportunity','Contract'). Just be sure to use the API name for an object (e.g. meeting__c for a custom object called meeting).
- Open a web browser and go to https://developerforce.salesforce.com
- Select the instance type (Production or Sandbox), select an API version (or leave the default) and agree to the terms of use
- Click Login with Salesforce
- Log in to your salesforce org (unless already logged in)
- Go to Query > SOQL Query


SELECT entitydefinition.developername, entitydefinition.qualifiedAPIname, QualifiedApiName, label, datatype, length, ExtraTypeInfo, precision FROM FieldDefinition WHERE EntityDefinition.QualifiedApiName !=null and IsFieldHistoryTracked = true2) Click Query
Sample output:

Note - The output includes object fields that salesforce enables track history on.
View tracked fields for specific objects
1) Copy and paste the following SOQL statement in the query window:
SELECT entitydefinition.developername, entitydefinition.qualifiedAPIname, QualifiedApiName, label, datatype, length, ExtraTypeInfo, precision FROM FieldDefinition WHERE EntityDefinition.QualifiedApiName in ('Account','Contact','Lead','Task','Event', 'Opportunity','Contract') AND IsFieldHistoryTracked = true2) Click Query
NOTE: Add or remove salesforce objects as required from the second SQOL statement
('Account','Contact','Lead','Task','Event', 'Opportunity','Contract'). Just be sure to use the API name for an object (e.g. meeting__c for a custom object called meeting).Export results to CSV file
In Workbench:
- Click the Bulk CSV option in View As

- Click Query
Confirmation screen:

In Salesforce:
- Go to Your Name (or Setup Icon) > Setup
- Enter "Bulk data" in setup search
- Click Bulk Data Load Jobs under Monitor > Jobs
- Click the Job Id

- Under Batches, click View Result

Results open as a CSV file for further analysis.
Within a few minutes you've got a complete list of fields with tracked history tracking enabled as well as the associated object and field parameters. Pretty sweet. The FieldDefinition object has a lot more information that you can get about fields in Salesforce but we’ll save that for another post.
- Click the Bulk CSV option in View As
- Click Query
Confirmation screen:


In Salesforce:
- Go to Your Name (or Setup Icon) > Setup
- Enter "Bulk data" in setup search
- Click Bulk Data Load Jobs under Monitor > Jobs
- Click the Job Id
- Under Batches, click View Result
Results open as a CSV file for further analysis.
Within a few minutes you've got a complete list of fields with tracked history tracking enabled as well as the associated object and field parameters. Pretty sweet. The FieldDefinition object has a lot more information that you can get about fields in Salesforce but we’ll save that for another post.
Within a few minutes you've got a complete list of fields with tracked history tracking enabled as well as the associated object and field parameters. Pretty sweet. The FieldDefinition object has a lot more information that you can get about fields in Salesforce but we’ll save that for another post.
Recap
- Salesforce has functionality to track changes to fields
- The Spring 19 release brings enforcement of the 18/24 month field history data retention policy
- Awesome admin’s can use SOQL to quickly find all of the track field’s and the related objects that exist within a Salesforce org
- Salesforce has functionality to track changes to fields
- The Spring 19 release brings enforcement of the 18/24 month field history data retention policy
- Awesome admin’s can use SOQL to quickly find all of the track field’s and the related objects that exist within a Salesforce org
Comments
Post a Comment